78 KiB
🚀 LightRAG: 简单且快速的检索增强生成(RAG)框架


🎉 新闻
- [2025.11]🎯[新功能]: 集成了 RAGAS 评估和 Langfuse 追踪。更新了 API 以在查询结果中返回召回上下文,支持上下文精度指标。
- [2025.10]🎯[可扩展性增强]: 消除了处理瓶颈,以高效支持大规模数据集。
- [2025.09]🎯[新功能]: 显著提升了 Qwen3-30B-A3B 等开源 LLM 的知识图谱提取准确性。
- [2025.08]🎯[新功能]: 现已支持 Reranker,显著提升混合查询性能(已设为默认查询模式)。
- [2025.08]🎯[新功能]: 添加了文档删除功能,并支持自动重新生成知识图谱,以确保最佳查询性能。
- [2025.06]🎯[新发布]: 我们的团队发布了 RAG-Anything —— 一个用于无缝处理文本、图像、表格和方程式的全功能多模态 RAG 系统。
- [2025.06]🎯[新功能]: LightRAG 现已集成 RAG-Anything,支持全面的多模态数据处理,实现对 PDF、图像、Office 文档、表格和公式等多种格式的无缝文档解析和 RAG 能力。详见多模态文档处理部分。
- [2025.03]🎯[新功能]: LightRAG 现已支持引用功能,实现了准确的源归因和增强的文档可追溯性。
- [2025.02]🎯[新功能]: 现在您可以使用 MongoDB 作为一体化存储解决方案,实现统一的数据管理。
- [2025.02]🎯[新发布]: 我们的团队发布了 VideoRAG —— 一个用于理解超长上下文视频的 RAG 系统。
- [2025.01]🎯[新发布]: 我们的团队发布了 MiniRAG,使用小型模型简化 RAG。
- [2025.01]🎯现在您可以使用 PostgreSQL 作为一体化存储解决方案进行数据管理。
- [2024.11]🎯[新资源]: LightRAG 的综合指南现已在 LearnOpenCV 上发布 —— 探索深入的教程和最佳实践。非常感谢博客作者的杰出贡献!
- [2024.11]🎯[新功能]: 推出 LightRAG WebUI —— 一个允许您通过直观的 Web 界面插入、查询和可视化 LightRAG 知识的仪表板。
- [2024.11]🎯[新功能]: 现在您可以使用 Neo4J 进行存储 —— 开启图数据库支持。
- [2024.10]🎯[新功能]: 我们添加了 LightRAG 介绍视频 的链接 —— 演示 LightRAG 的各项功能。感谢作者的杰出贡献!
- [2024.10]🎯[新频道]: 我们创建了一个 Discord 频道!💬 欢迎加入我们的社区进行分享、讨论和协作! 🎉🎉
- [2024.10]🎯[新功能]: LightRAG 现在支持 Ollama 模型!
安装
💡 使用 uv 进行包管理: 本项目使用 uv 进行快速可靠的 Python 包管理。 首先安装 uv:
curl -LsSf https://astral.sh/uv/install.sh | sh(Unix/macOS) 或powershell -c "irm https://astral.sh/uv/install.ps1 | iex"(Windows)注意:如果您愿意,也可以使用 pip,但为了获得更好的性能 and 更可靠的依赖管理,建议使用 uv。
📦 离线部署: 对于离线或隔离环境,请参阅离线部署指南,了解预安装所有依赖项和缓存文件的说明。
安装LightRAG服务器
LightRAG服务器旨在提供Web UI和API支持。Web UI便于文档索引、知识图谱探索和简单的RAG查询界面。LightRAG服务器还提供兼容Ollama的接口,旨在将LightRAG模拟为Ollama聊天模型。这使得AI聊天机器人(如Open WebUI)可以轻松访问LightRAG。
- 从PyPI安装
# 使用 uv (推荐)
uv pip install "lightrag-hku[api]"
# 或使用 pip
# pip install "lightrag-hku[api]"

# 构建前端代码
cd lightrag_webui
bun install --frozen-lockfile
bun run build
cd ..

# 配置 env 文件
cp env.example .env  # 使用你的LLM和Embedding模型访问参数更新.env文件
# 启动API-WebUI服务
lightrag-server
- 从源代码安装
git clone https://github.com/HKUDS/LightRAG.git
cd LightRAG

# 使用 uv (推荐)
# 注意: uv sync 会自动在 .venv/ 目录创建虚拟环境
uv sync --extra api
source .venv/bin/activate  # 激活虚拟环境 (Linux/macOS)
# Windows 系统: .venv\Scripts\activate

### 或使用 pip 和虚拟环境
# python -m venv .venv
### source .venv/bin/activate  # Windows: .venv\Scripts\activate
# pip install -e ".[api]"

# 构建前端代码
cd lightrag_webui
bun install --frozen-lockfile
bun run build
cd ..

# 配置 env 文件
cp env.example .env  # 使用你的LLM和Embedding模型访问参数更新.env文件
# 启动API-WebUI服务
lightrag-server
- 使用 Docker Compose 启动 LightRAG 服务器
git clone https://github.com/HKUDS/LightRAG.git
cd LightRAG
cp env.example .env  # 使用你的LLM和Embedding模型访问参数更新.env文件
# modify LLM and Embedding settings in .env
docker compose up
在此获取LightRAG docker镜像历史版本: LightRAG Docker Images
安装LightRAG Core
- 从源代码安装(推荐)
cd LightRAG
# 注意: uv sync 会自动在 .venv/ 目录创建虚拟环境
uv sync
source .venv/bin/activate  # 激活虚拟环境 (Linux/macOS)
# Windows 系统: .venv\Scripts\activate

# 或: pip install -e .
- 从PyPI安装
uv pip install lightrag-hku
# 或: pip install lightrag-hku
快速开始
LightRAG的LLM及配套技术栈要求
LightRAG对大型语言模型(LLM)的能力要求远高于传统RAG,因为它需要LLM执行文档中的实体关系抽取任务。配置合适的Embedding和Reranker模型对提高查询表现也至关重要。
- LLM选型:
- 推荐选用参数量至少为32B的LLM。
- 上下文长度至少为32KB,推荐达到64KB。
- 在文档索引阶段不建议选择推理模型。
- 在查询阶段建议选择比索引阶段能力更强的模型,以达到更高的查询效果。
- Embedding模型:
- 高性能的Embedding模型对RAG至关重要。
- 推荐使用主流的多语言Embedding模型,例如:BAAI/bge-m3 和 text-embedding-3-large。
- 重要提示:在文档索引前必须确定使用的Embedding模型,且在文档查询阶段必须沿用与索引阶段相同的模型。有些存储(例如PostgreSQL)在首次建立数表的时候需要确定向量维度,因此更换Embedding模型后需要删除向量相关库表,以便让LightRAG重建新的库表。
- Reranker模型配置:
- 配置Reranker模型能够显著提升LightRAG的检索效果。
- 启用Reranker模型后,推荐将“mix模式”设为默认查询模式。
- 推荐选用主流的Reranker模型,例如:BAAI/bge-reranker-v2-m3 或 Jina 等服务商提供的模型。
使用LightRAG服务器
有关LightRAG服务器的更多信息,请参阅LightRAG服务器。
使用LightRAG Core
LightRAG核心功能的示例代码请参见examples目录。您还可参照视频视频完成环境配置。若已持有OpenAI API密钥,可以通过以下命令运行演示代码:
### you should run the demo code with project folder
cd LightRAG
### provide your API-KEY for OpenAI
export OPENAI_API_KEY="sk-...your_opeai_key..."
### download the demo document of "A Christmas Carol" by Charles Dickens
curl https://raw.githubusercontent.com/gusye1234/nano-graphrag/main/tests/mock_data.txt > ./book.txt
### run the demo code
python examples/lightrag_openai_demo.py
如需流式响应示例的实现代码,请参阅 examples/lightrag_openai_compatible_demo.py。运行前,请确保根据需求修改示例代码中的LLM及嵌入模型配置。
注意1:在运行demo程序的时候需要注意,不同的测试程序可能使用的是不同的embedding模型,更换不同的embeding模型的时候需要把清空数据目录(./dickens),否则层序执行会出错。如果你想保留LLM缓存,可以在清除数据目录时保留kv_store_llm_response_cache.json文件。
注意2:官方支持的示例代码仅为 lightrag_openai_demo.py 和 lightrag_openai_compatible_demo.py 两个文件。其他示例文件均为社区贡献内容,尚未经过完整测试与优化。
使用LightRAG Core进行编程
⚠️ 如果您希望将LightRAG集成到您的项目中,建议您使用LightRAG Server提供的REST API。LightRAG Core通常用于嵌入式应用,或供希望进行研究与评估的学者使用。
⚠️ 重要:初始化要求
LightRAG 在使用前需要显式初始化。 创建 LightRAG 实例后,您必须调用 await rag.initialize_storages(),否则将出现错误。
一个简单程序
以下Python代码片段演示了如何初始化LightRAG、插入文本并进行查询:
import os
import asyncio
from lightrag import LightRAG, QueryParam
from lightrag.llm.openai import gpt_4o_mini_complete, gpt_4o_complete, openai_embed
from lightrag.utils import setup_logger

setup_logger("lightrag", level="INFO")

WORKING_DIR = "./rag_storage"
if not os.path.exists(WORKING_DIR):
    os.mkdir(WORKING_DIR)

async def initialize_rag():
    rag = LightRAG(
        working_dir=WORKING_DIR,
        embedding_func=openai_embed,
        llm_model_func=gpt_4o_mini_complete,
    )
    # IMPORTANT: Both initialization calls are required!
    await rag.initialize_storages()  # Initialize storage backends
    return rag

async def main():
    try:
        # 初始化RAG实例
        rag = await initialize_rag()
        await rag.ainsert("Your text")

        # 执行混合检索
        mode = "hybrid"
        print(
          await rag.aquery(
              "What are the top themes in this story?",
              param=QueryParam(mode=mode)
          )
        )

    except Exception as e:
        print(f"发生错误: {e}")
    finally:
        if rag:
            await rag.finalize_storages()

if __name__ == "__main__":
    asyncio.run(main())
重要说明:
- 运行脚本前请先导出你的OPENAI_API_KEY环境变量。
- 该程序使用LightRAG的默认存储设置,所有数据将持久化在WORKING_DIR/rag_storage目录下。
- 该示例仅展示了初始化LightRAG对象的最简单方式:注入embedding和LLM函数,并在创建LightRAG对象后初始化存储和管道状态。
LightRAG初始化参数
以下是完整的LightRAG对象初始化参数清单:
参数
| 参数 | 类型 | 说明 | 默认值 |
|---|---|---|---|
| working_dir | str |
存储缓存的目录 | lightrag_cache+timestamp |
| workspace | str | 用于不同 LightRAG 实例之间数据隔离的工作区名称 | |
| kv_storage | str |
Storage type for documents and text chunks. Supported types: JsonKVStorage,PGKVStorage,RedisKVStorage,MongoKVStorage |
JsonKVStorage |
| vector_storage | str |
Storage type for embedding vectors. Supported types: NanoVectorDBStorage,PGVectorStorage,MilvusVectorDBStorage,ChromaVectorDBStorage,FaissVectorDBStorage,MongoVectorDBStorage,QdrantVectorDBStorage |
NanoVectorDBStorage |
| graph_storage | str |
Storage type for graph edges and nodes. Supported types: NetworkXStorage,Neo4JStorage,PGGraphStorage,AGEStorage |
NetworkXStorage |
| doc_status_storage | str |
Storage type for documents process status. Supported types: JsonDocStatusStorage,PGDocStatusStorage,MongoDocStatusStorage |
JsonDocStatusStorage |
| chunk_token_size | int |
拆分文档时每个块的最大令牌大小 | 1200 |
| chunk_overlap_token_size | int |
拆分文档时两个块之间的重叠令牌大小 | 100 |
| tokenizer | Tokenizer |
用于将文本转换为 tokens(数字)以及使用遵循 TokenizerInterface 协议的 .encode() 和 .decode() 函数将 tokens 转换回文本的函数。 如果您不指定,它将使用默认的 Tiktoken tokenizer。 | TiktokenTokenizer |
| tiktoken_model_name | str |
如果您使用的是默认的 Tiktoken tokenizer,那么这是要使用的特定 Tiktoken 模型的名称。如果您提供自己的 tokenizer,则忽略此设置。 | gpt-4o-mini |
| entity_extract_max_gleaning | int |
实体提取过程中的循环次数,附加历史消息 | 1 |
| node_embedding_algorithm | str |
节点嵌入算法(当前未使用) | node2vec |
| node2vec_params | dict |
节点嵌入的参数 | {"dimensions": 1536,"num_walks": 10,"walk_length": 40,"window_size": 2,"iterations": 3,"random_seed": 3,} |
| embedding_func | EmbeddingFunc |
从文本生成嵌入向量的函数 | openai_embed |
| embedding_batch_num | int |
嵌入过程的最大批量大小(每批发送多个文本) | 32 |
| embedding_func_max_async | int |
最大并发异步嵌入进程数 | 16 |
| llm_model_func | callable |
LLM生成的函数 | gpt_4o_mini_complete |
| llm_model_name | str |
用于生成的LLM模型名称 | meta-llama/Llama-3.2-1B-Instruct |
| summary_context_size | int |
合并实体关系摘要时送给LLM的最大令牌数 | 10000(由环境变量 SUMMARY_MAX_CONTEXT 设置) |
| summary_max_tokens | int |
合并实体关系描述的最大令牌数长度 | 500(由环境变量 SUMMARY_MAX_TOKENS 设置) |
| llm_model_max_async | int |
最大并发异步LLM进程数 | 4(默认值由环境变量MAX_ASYNC更改) |
| llm_model_kwargs | dict |
LLM生成的附加参数 | |
| vector_db_storage_cls_kwargs | dict |
向量数据库的附加参数,如设置节点和关系检索的阈值 | cosine_better_than_threshold: 0.2(默认值由环境变量COSINE_THRESHOLD更改) |
| enable_llm_cache | bool |
如果为TRUE,将LLM结果存储在缓存中;重复的提示返回缓存的响应 |
TRUE |
| enable_llm_cache_for_entity_extract | bool |
如果为TRUE,将实体提取的LLM结果存储在缓存中;适合初学者调试应用程序 |
TRUE |
| addon_params | dict |
附加参数,例如{"language": "Simplified Chinese", "entity_types": ["organization", "person", "location", "event"]}:设置示例限制、输出语言和文档处理的批量大小 |
language: English` |
| embedding_cache_config | dict |
问答缓存的配置。包含三个参数:enabled:布尔值,启用/禁用缓存查找功能。启用时,系统将在生成新答案之前检查缓存的响应。similarity_threshold:浮点值(0-1),相似度阈值。当新问题与缓存问题的相似度超过此阈值时,将直接返回缓存的答案而不调用LLM。use_llm_check:布尔值,启用/禁用LLM相似度验证。启用时,在返回缓存答案之前,将使用LLM作为二次检查来验证问题之间的相似度。 |
默认:{"enabled": False, "similarity_threshold": 0.95, "use_llm_check": False} |
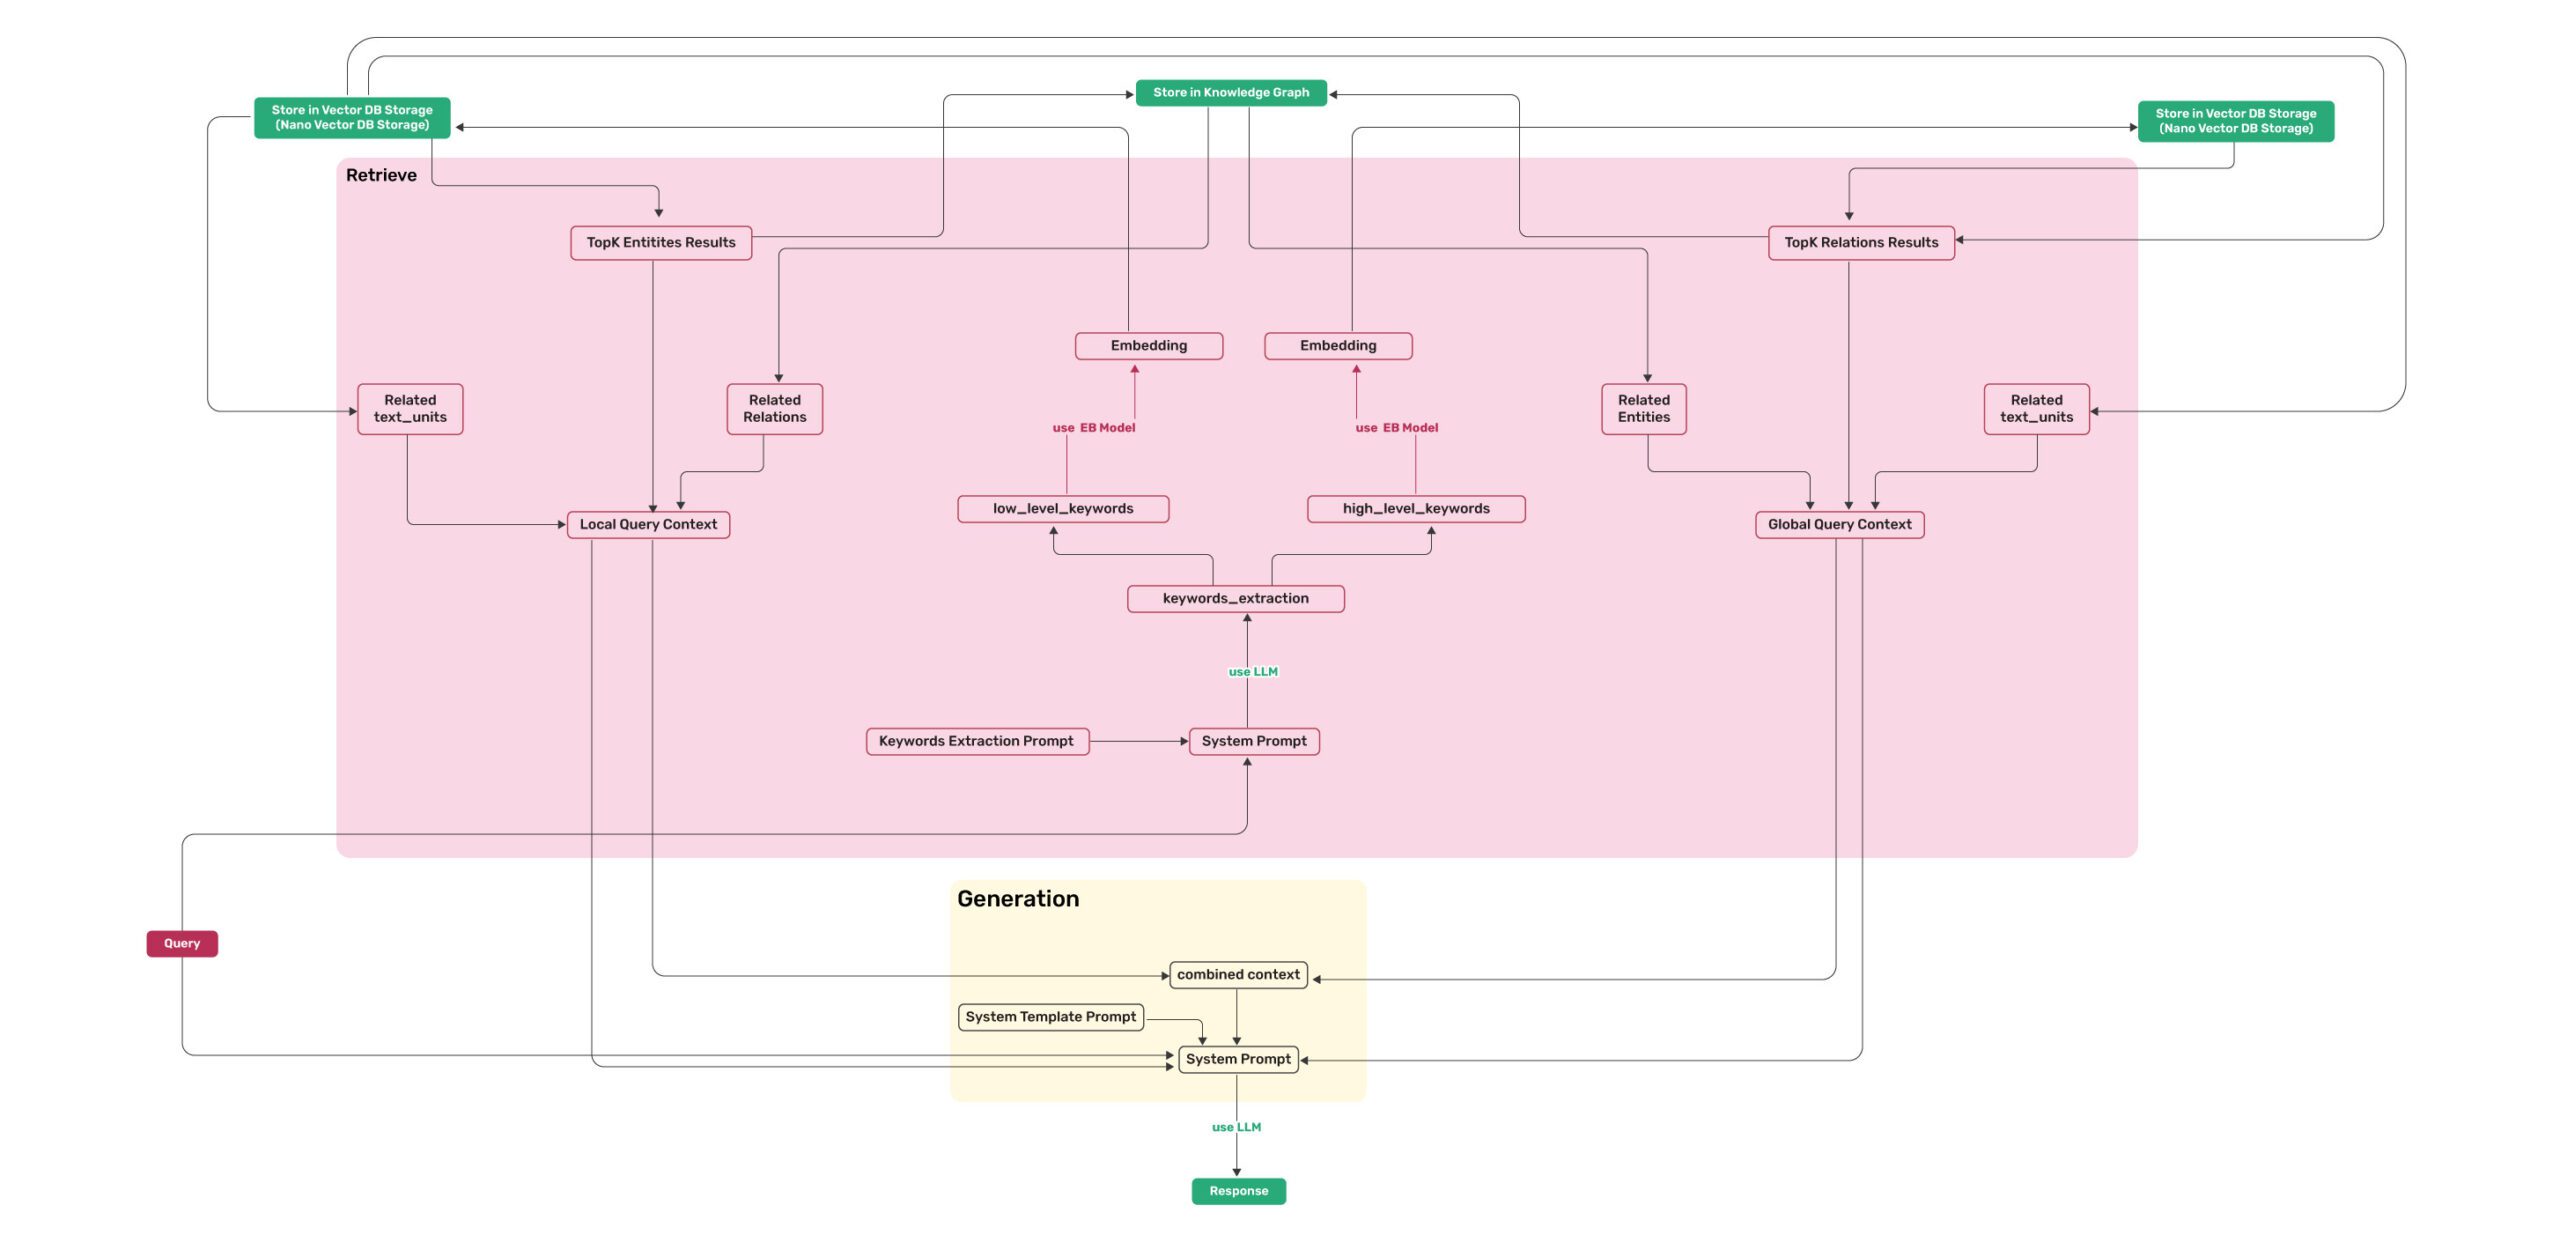
查询参数
使用QueryParam控制你的查询行为:
class QueryParam:
    """Configuration parameters for query execution in LightRAG."""

    mode: Literal["local", "global", "hybrid", "naive", "mix", "bypass"] = "global"
    """Specifies the retrieval mode:
    - "local": Focuses on context-dependent information.
    - "global": Utilizes global knowledge.
    - "hybrid": Combines local and global retrieval methods.
    - "naive": Performs a basic search without advanced techniques.
    - "mix": Integrates knowledge graph and vector retrieval.
    """

    only_need_context: bool = False
    """If True, only returns the retrieved context without generating a response."""

    only_need_prompt: bool = False
    """If True, only returns the generated prompt without producing a response."""

    response_type: str = "Multiple Paragraphs"
    """Defines the response format. Examples: 'Multiple Paragraphs', 'Single Paragraph', 'Bullet Points'."""

    stream: bool = False
    """If True, enables streaming output for real-time responses."""

    top_k: int = int(os.getenv("TOP_K", "60"))
    """Number of top items to retrieve. Represents entities in 'local' mode and relationships in 'global' mode."""

    chunk_top_k: int = int(os.getenv("CHUNK_TOP_K", "20"))
    """Number of text chunks to retrieve initially from vector search and keep after reranking.
    If None, defaults to top_k value.
    """

    max_entity_tokens: int = int(os.getenv("MAX_ENTITY_TOKENS", "6000"))
    """Maximum number of tokens allocated for entity context in unified token control system."""

    max_relation_tokens: int = int(os.getenv("MAX_RELATION_TOKENS", "8000"))
    """Maximum number of tokens allocated for relationship context in unified token control system."""

    max_total_tokens: int = int(os.getenv("MAX_TOTAL_TOKENS", "30000"))
    """Maximum total tokens budget for the entire query context (entities + relations + chunks + system prompt)."""

    # History messages are only sent to LLM for context, not used for retrieval
    conversation_history: list[dict[str, str]] = field(default_factory=list)
    """Stores past conversation history to maintain context.
    Format: [{"role": "user/assistant", "content": "message"}].
    """

    # Deprecated (ids filter lead to potential hallucination effects)
    ids: list[str] | None = None
    """List of ids to filter the results."""

    model_func: Callable[..., object] | None = None
    """Optional override for the LLM model function to use for this specific query.
    If provided, this will be used instead of the global model function.
    This allows using different models for different query modes.
    """

    user_prompt: str | None = None
    """User-provided prompt for the query.
    Addition instructions for LLM. If provided, this will be inject into the prompt template.
    It's purpose is the let user customize the way LLM generate the response.
    """

    enable_rerank: bool = True
    """Enable reranking for retrieved text chunks. If True but no rerank model is configured, a warning will be issued.
    Default is True to enable reranking when rerank model is available.
    """
top_k的默认值可以通过环境变量TOP_K更改。
LLM and Embedding注入
LightRAG 需要利用LLM和Embeding模型来完成文档索引和知识库查询工作。在初始化LightRAG的时候需要把阶段,需要把LLM和Embedding的操作函数注入到对象中:
使用类OpenAI的API
- LightRAG还支持类OpenAI的聊天/嵌入API:
import os
import numpy as np
from lightrag.utils import wrap_embedding_func_with_attrs
from lightrag.llm.openai import openai_complete_if_cache, openai_embed

async def llm_model_func(
    prompt, system_prompt=None, history_messages=[], keyword_extraction=False, **kwargs
) -> str:
    return await openai_complete_if_cache(
        "solar-mini",
        prompt,
        system_prompt=system_prompt,
        history_messages=history_messages,
        api_key=os.getenv("UPSTAGE_API_KEY"),
        base_url="https://api.upstage.ai/v1/solar",
        **kwargs
    )

@wrap_embedding_func_with_attrs(embedding_dim=4096, max_token_size=8192, model_name="solar-embedding-1-large-query")
async def embedding_func(texts: list[str]) -> np.ndarray:
    return await openai_embed.func(
        texts,
        model="solar-embedding-1-large-query",
        api_key=os.getenv("UPSTAGE_API_KEY"),
        base_url="https://api.upstage.ai/v1/solar"
    )

async def initialize_rag():
    rag = LightRAG(
        working_dir=WORKING_DIR,
        llm_model_func=llm_model_func,
        embedding_func=embedding_func  # 直接传入装饰后的函数
    )

    await rag.initialize_storages()
    return rag
关于嵌入函数封装的重要说明:
EmbeddingFunc不能嵌套封装。已经被@wrap_embedding_func_with_attrs装饰过的嵌入函数(如openai_embed、ollama_embed等)不能再次使用EmbeddingFunc()封装。这就是为什么在创建自定义嵌入函数时,我们调用xxx_embed.func(底层未封装的函数)而不是直接调用xxx_embed。
使用 Hugging Face 模型
- 如果您想使用 Hugging Face 模型,只需要按如下方式设置 LightRAG:
参见 lightrag_hf_demo.py
from functools import partial
from transformers import AutoTokenizer, AutoModel

# Pre-load tokenizer and model
tokenizer = AutoTokenizer.from_pretrained("sentence-transformers/all-MiniLM-L6-v2")
embed_model = AutoModel.from_pretrained("sentence-transformers/all-MiniLM-L6-v2")

# 使用 Hugging Face 模型初始化 LightRAG
rag = LightRAG(
    working_dir=WORKING_DIR,
    llm_model_func=hf_model_complete,  # 使用 Hugging Face 模型进行文本生成
    llm_model_name='meta-llama/Llama-3.1-8B-Instruct',  # Hugging Face 的模型名称
    # 使用 Hugging Face 嵌入函数
    embedding_func=EmbeddingFunc(
        embedding_dim=384,
        max_token_size=2048,
        model_name="sentence-transformers/all-MiniLM-L6-v2",
        func=partial(
            hf_embed.func,  # 使用 .func 访问底层未封装的函数
            tokenizer=tokenizer,
            embed_model=embed_model
        )
    ),
)
使用Ollama模型
综述
如果您想使用Ollama模型,您需要拉取计划使用的模型和嵌入模型,例如nomic-embed-text。
然后您只需要按如下方式设置LightRAG:
import numpy as np
from lightrag.utils import wrap_embedding_func_with_attrs
from lightrag.llm.ollama import ollama_model_complete, ollama_embed

@wrap_embedding_func_with_attrs(embedding_dim=768, max_token_size=8192, model_name="nomic-embed-text")
async def embedding_func(texts: list[str]) -> np.ndarray:
    return await ollama_embed.func(texts, embed_model="nomic-embed-text")

# Initialize LightRAG with Ollama model
rag = LightRAG(
    working_dir=WORKING_DIR,
    llm_model_func=ollama_model_complete,  # Use Ollama model for text generation
    llm_model_name='your_model_name', # Your model name
    embedding_func=embedding_func,  # Pass the decorated function directly
)
- 增加上下文大小
为了使 LightRAG 正常工作,上下文大小至少需要 32k tokens。默认情况下,Ollama 模型的上下文大小为 8k。您可以通过以下两种方式之一来实现:
- 在 Modelfile 中增加
num_ctx参数
- 拉取模型:
ollama pull qwen2
- 显示模型文件:
ollama show --modelfile qwen2 > Modelfile
- 编辑 Modelfile,添加以下行:
PARAMETER num_ctx 32768
- 创建修改后的模型:
ollama create -f Modelfile qwen2m
- 通过 Ollama API 设置
num_ctx
您可以使用 llm_model_kwargs 参数来配置 Ollama:
import numpy as np
from lightrag.utils import wrap_embedding_func_with_attrs
from lightrag.llm.ollama import ollama_model_complete, ollama_embed

@wrap_embedding_func_with_attrs(embedding_dim=768, max_token_size=8192, model_name="nomic-embed-text")
async def embedding_func(texts: list[str]) -> np.ndarray:
    return await ollama_embed.func(texts, embed_model="nomic-embed-text")

rag = LightRAG(
    working_dir=WORKING_DIR,
    llm_model_func=ollama_model_complete,  # 使用 Ollama 模型进行文本生成
    llm_model_name='your_model_name', # 您的模型名称
    llm_model_kwargs={"options": {"num_ctx": 32768}},
    embedding_func=embedding_func,  # 直接传入装饰后的函数
)
关于嵌入函数封装的重要说明:
EmbeddingFunc不能嵌套封装。已经被@wrap_embedding_func_with_attrs装饰过的嵌入函数(如openai_embed、ollama_embed等)不能再次使用EmbeddingFunc()封装。这就是为什么在创建自定义嵌入函数时,我们调用xxx_embed.func(底层未封装的函数)而不是直接调用xxx_embed。
- 低显存 GPU
如果要在低显存 GPU 上运行此实验,您应该选择较小的模型并调整上下文窗口(增加上下文会增加内存消耗)。例如,在一块改装的 6GB 显存的挖矿 GPU 上运行此 Ollama 示例,需要在使用 gemma2:2b 时将上下文大小设置为 26k。它能够在 book.txt 中找到 197 个实体和 19 个关系。
LlamaIndex
LightRAG 支持与 LlamaIndex 集成(llm/llama_index_impl.py):
- 通过 LlamaIndex 与 OpenAI 和其他提供商集成
- 详细设置请参阅 LlamaIndex 文档 或 示例
示例用法
# 使用 LlamaIndex 直接访问 OpenAI
import asyncio
from lightrag import LightRAG
from lightrag.llm.llama_index_impl import llama_index_complete_if_cache, llama_index_embed
from llama_index.embeddings.openai import OpenAIEmbedding
from llama_index.llms.openai import OpenAI
from lightrag.utils import setup_logger

# 为 LightRAG 设置日志处理器
setup_logger("lightrag", level="INFO")

async def initialize_rag():
    rag = LightRAG(
        working_dir="your/path",
        llm_model_func=llama_index_complete_if_cache,  # 与 LlamaIndex 兼容的补全函数
        embedding_func=EmbeddingFunc(    # 与 LlamaIndex 兼容的嵌入函数
            embedding_dim=1536,
            max_token_size=2048,
            model_name=embed_model,
            func=partial(llama_index_embed.func, embed_model=embed_model)  # 使用 .func 访问未封装的原始函数
        ),
    )

    await rag.initialize_storages()
    return rag

def main():
    # 初始化 RAG 实例
    rag = asyncio.run(initialize_rag())

    with open("./book.txt", "r", encoding="utf-8") as f:
        rag.insert(f.read())

    # 执行朴素搜索
    print(
        rag.query("What are the top themes in this story?", param=QueryParam(mode="naive"))
    )

    # 执行本地搜索
    print(
        rag.query("What are the top themes in this story?", param=QueryParam(mode="local"))
    )

    # 执行全局搜索
    print(
        rag.query("What are the top themes in this story?", param=QueryParam(mode="global"))
    )

    # 执行混合搜索
    print(
        rag.query("What are the top themes in this story?", param=QueryParam(mode="hybrid"))
    )

if __name__ == "__main__":
    main()
详细文档和示例请参阅:
使用 Azure OpenAI 模型
如果您想使用 Azure OpenAI 模型,您只需要按如下方式设置 LightRAG:
import os
import numpy as np
from lightrag.utils import wrap_embedding_func_with_attrs
from lightrag.llm.azure_openai import azure_openai_complete_if_cache, azure_openai_embed

# 配置生成模型
async def llm_model_func(
    prompt, system_prompt=None, history_messages=[], keyword_extraction=False, **kwargs
) -> str:
    return await azure_openai_complete_if_cache(
        prompt,
        system_prompt=system_prompt,
        history_messages=history_messages,
        api_key=os.getenv("AZURE_OPENAI_API_KEY"),
        azure_endpoint=os.getenv("AZURE_OPENAI_ENDPOINT"),
        api_version=os.getenv("AZURE_OPENAI_API_VERSION"),
        deployment_name=os.getenv("AZURE_OPENAI_DEPLOYMENT_NAME"),
        **kwargs
    )

# 配置嵌入模型
@wrap_embedding_func_with_attrs(
    embedding_dim=1536,
    max_token_size=8192,
    model_name=os.getenv("AZURE_OPENAI_EMBEDDING_MODEL")
)
async def embedding_func(texts: list[str]) -> np.ndarray:
    return await azure_openai_embed.func(
        texts,
        api_key=os.getenv("AZURE_OPENAI_API_KEY"),
        azure_endpoint=os.getenv("AZURE_OPENAI_ENDPOINT"),
        api_version=os.getenv("AZURE_OPENAI_API_VERSION"),
        deployment_name=os.getenv("AZURE_OPENAI_EMBEDDING_DEPLOYMENT_NAME")
    )

rag = LightRAG(
    working_dir=WORKING_DIR,
    llm_model_func=llm_model_func,
    embedding_func=embedding_func
)
使用 Google Gemini 模型
如果您想使用 Google Gemini 模型,您只需要按如下方式设置 LightRAG:
import os
import numpy as np
from lightrag.utils import wrap_embedding_func_with_attrs
from lightrag.llm.gemini import gemini_complete, gemini_embed

# 配置生成模型
async def llm_model_func(
    prompt, system_prompt=None, history_messages=[], keyword_extraction=False, **kwargs
) -> str:
    return await gemini_complete(
        prompt,
        system_prompt=system_prompt,
        history_messages=history_messages,
        api_key=os.getenv("GEMINI_API_KEY"),
        model="gemini-1.5-flash",
        **kwargs
    )

# 配置嵌入模型
@wrap_embedding_func_with_attrs(
    embedding_dim=768,
    max_token_size=2048,
    model_name="models/text-embedding-004"
)
async def embedding_func(texts: list[str]) -> np.ndarray:
    return await gemini_embed.func(
        texts,
        api_key=os.getenv("GEMINI_API_KEY"),
        model="models/text-embedding-004"
    )

rag = LightRAG(
    working_dir=WORKING_DIR,
    llm_model_func=llm_model_func,
    llm_model_name="gemini-2.0-flash",
    embedding_func=embedding_func
)
Rerank 函数注入
为了提升检索质量,可以基于更有效的相关性评分模型对文档进行重新排序。rerank.py 文件提供了三个 Reranker 服务商的驱动函数:
- Cohere / vLLM:
cohere_rerank - Jina AI:
jina_rerank - 阿里云:
ali_rerank
您可以将其中一个函数注入到 LightRAG 对象的 rerank_model_func 属性中。这将使 LightRAG 的查询函数能够使用注入的函数对检索到的文本块进行重新排序。详细用法请参考 examples/rerank_example.py 文件。
User Prompt 与 Query 的区别
使用 LightRAG 进行内容查询时,应避免将搜索过程与不相关的输出处理混合在一起,因为这会显著影响查询效果。QueryParam 中的 user_prompt 参数专门用于解决此问题 - 它不参与 RAG 检索阶段,而是在查询完成后指导 LLM 如何处理检索到的结果。使用方法如下:
# 创建查询参数
query_param = QueryParam(
    mode = "hybrid",  # 其他模式:local, global, hybrid, mix, naive
    user_prompt = "对于图表,使用 mermaid 格式,节点名称使用英文或拼音,显示标签使用中文",
)

# 查询并处理
response_default = rag.query(
    "请为斯克鲁奇绘制人物关系图",
    param=query_param
)
print(response_default)
插入
基本插入
# 基本插入
rag.insert("文本")
批量插入
# 基本批量插入:一次插入多个文本
rag.insert(["文本1", "文本2",...])

# 自定义批量大小配置的批量插入
rag = LightRAG(
    ...
    working_dir=WORKING_DIR,
    max_parallel_insert = 4
)

rag.insert(["文本1", "文本2", "文本3", ...])  # 文档将以每批 4 个的方式处理
max_parallel_insert 参数决定了文档索引管道中并发处理的文档数量。如果未指定,默认值为 2。我们建议将此设置保持在 10 以下,因为性能瓶颈通常在于大语言模型(LLM)的处理能力。
带 ID 插入
如果您想为文档提供自定义 ID,文档数量和 ID 数量必须相同。
# 插入单个文本,并为其提供 ID
rag.insert("文本1", ids=["文本1的ID"])

# 插入多个文本,并为它们提供 ID
rag.insert(["文本1", "文本2",...], ids=["文本1的ID", "文本2的ID"])
使用管道插入
apipeline_enqueue_documents 和 apipeline_process_enqueue_documents 函数允许您将文档增量插入到图中。这对于希望在后台处理文档同时允许主线程继续执行的场景非常有用。
rag = LightRAG(..)

await rag.apipeline_enqueue_documents(input)
# 在循环中的例程
await rag.apipeline_process_enqueue_documents(input)
多文件类型支持插入
textract 支持读取 TXT、DOCX、PPTX、CSV 和 PDF 等文件类型。
import textract

file_path = 'TEXT.pdf'
text_content = textract.process(file_path)

rag.insert(text_content.decode('utf-8'))
引用功能
通过提供文件路径,系统可以确保来源可以追溯到原始文档。
# 定义文档及其文件路径
documents = ["文档内容 1", "文档内容 2"]
file_paths = ["path/to/doc1.txt", "path/to/doc2.txt"]

# 带文件路径插入文档
rag.insert(documents, file_paths=file_paths)
存储方案
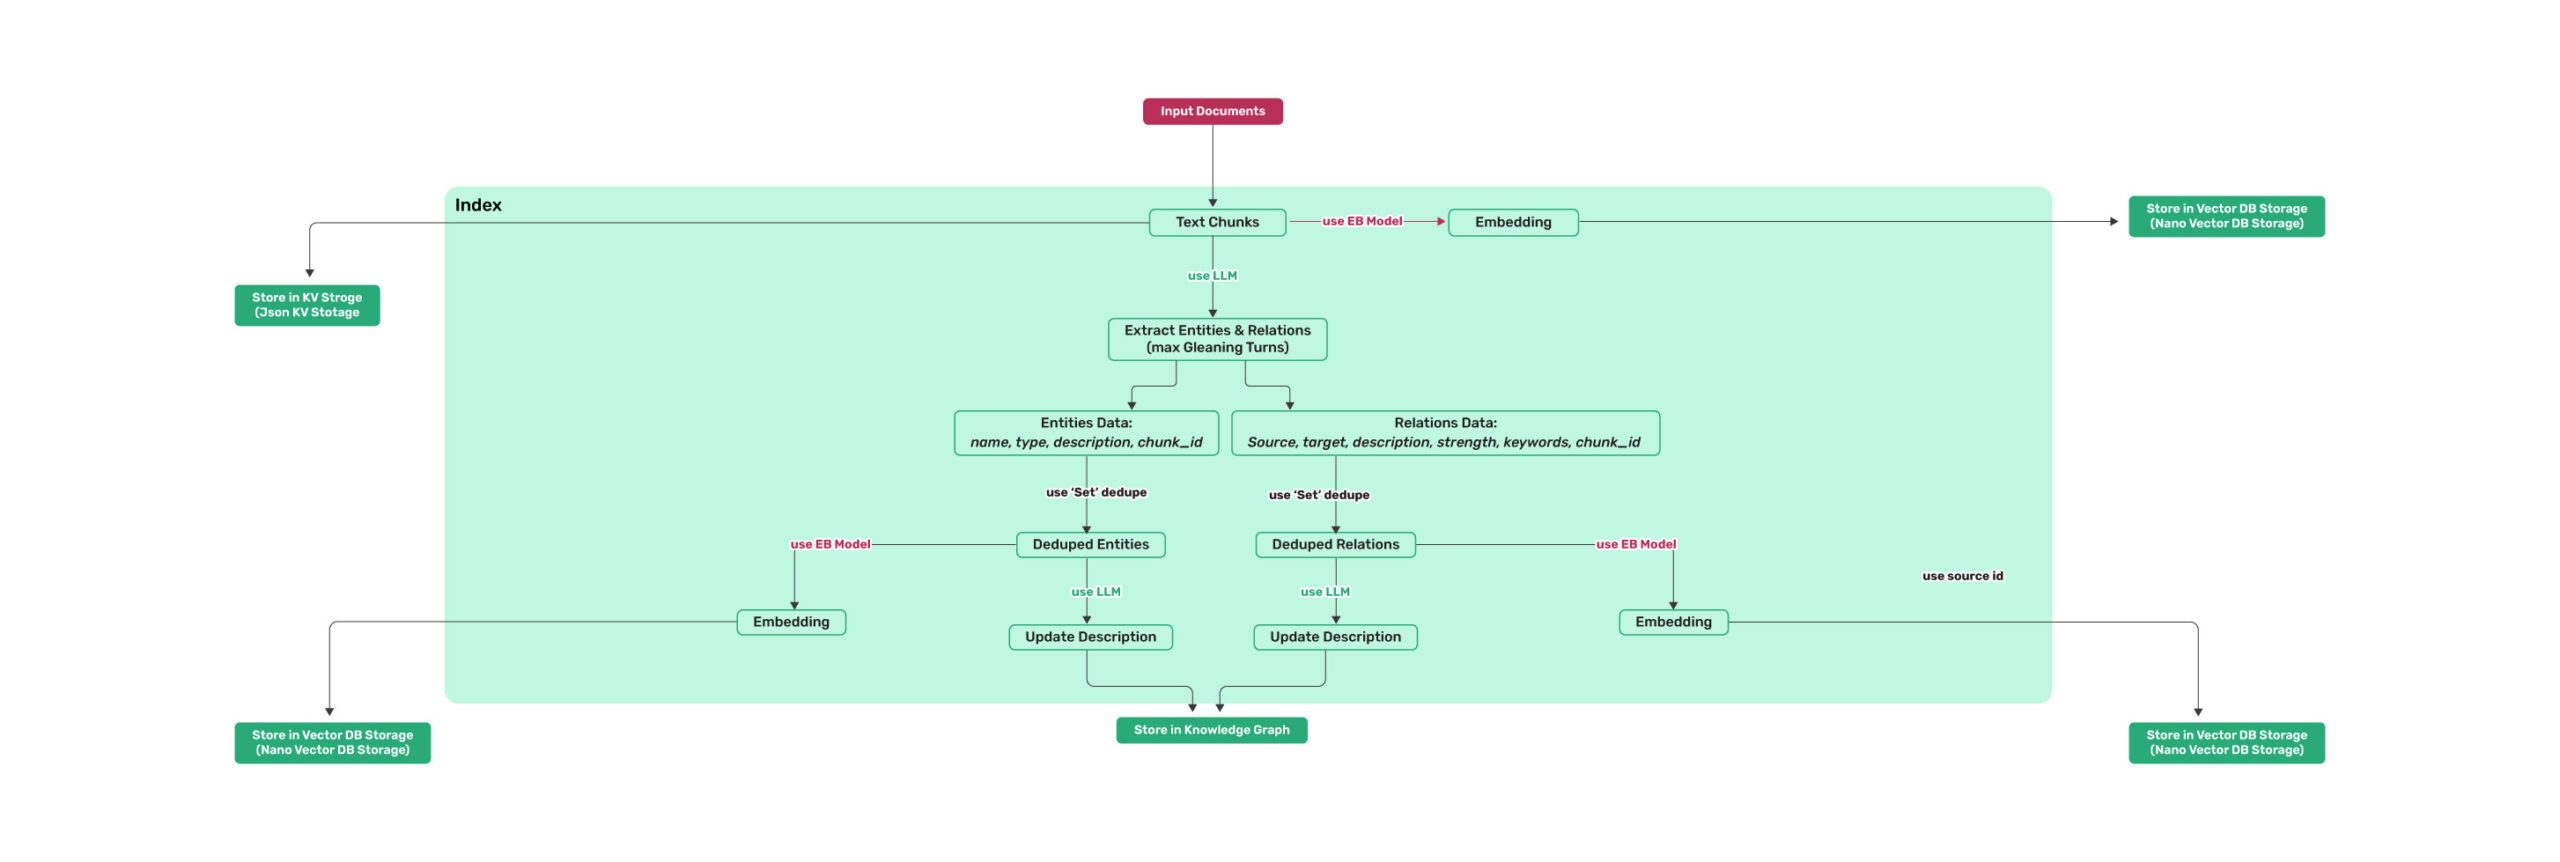
LightRAG 使用 4 种类型的存储来满足不同用途:
- KV_STORAGE:LLM 响应缓存、文本块、文档信息
- VECTOR_STORAGE:实体向量、关系向量、文本块向量
- GRAPH_STORAGE:实体关系图
- DOC_STATUS_STORAGE:文档索引状态
每种存储类型都有多种实现:
- KV_STORAGE 支持的实现:
JsonKVStorage    JsonFile(默认)
PGKVStorage      Postgres
RedisKVStorage   Redis
MongoKVStorage   MongoDB
- GRAPH_STORAGE 支持的实现:
NetworkXStorage      NetworkX(默认)
Neo4JStorage         Neo4J
PGGraphStorage       PostgreSQL with AGE 插件
MemgraphStorage      Memgraph
测试表明,Neo4J 在生产环境中的性能优于带有 AGE 插件的 PostgreSQL。
- VECTOR_STORAGE 支持的实现:
NanoVectorDBStorage         NanoVector(默认)
PGVectorStorage             Postgres
MilvusVectorDBStorage       Milvus
FaissVectorDBStorage        Faiss
QdrantVectorDBStorage       Qdrant
MongoVectorDBStorage        MongoDB
- DOC_STATUS_STORAGE 支持的实现:
JsonDocStatusStorage        JsonFile(默认)
PGDocStatusStorage          Postgres
MongoDocStatusStorage       MongoDB
各存储类型的示例连接配置可在 env.example 文件中找到。连接字符串中的数据库实例需要您预先在数据库服务器上创建。LightRAG 仅负责在数据库实例中创建表,不负责创建数据库实例本身。如果使用 Redis 作为存储,请记住配置 Redis 的自动数据持久化规则,否则 Redis 服务重启后数据将会丢失。如果使用 PostgreSQL,建议使用 16.6 或更高版本。
使用 Neo4J 存储
- 对于生产级场景,您很可能需要使用企业级解决方案
- 用于知识图谱存储。推荐在 Docker 中运行 Neo4J 进行无缝本地测试。
- 参见:https://hub.docker.com/_/neo4j
export NEO4J_URI="neo4j://localhost:7687"
export NEO4J_USERNAME="neo4j"
export NEO4J_PASSWORD="password"

# 为 LightRAG 设置日志
setup_logger("lightrag", level="INFO")

# 启动项目时,请确保通过指定 graph_storage="Neo4JStorage" 来覆盖默认的 KG: NetworkX。
# 使用 Neo4J 实现初始化 LightRAG。
async def initialize_rag():
    rag = LightRAG(
        working_dir=WORKING_DIR,
        llm_model_func=gpt_4o_mini_complete,  # 使用 gpt_4o_mini_complete LLM 模型
        graph_storage="Neo4JStorage", #<-----------覆盖 KG 默认值
    )

    # 初始化数据库连接
    await rag.initialize_storages()
    # 初始化文档处理的管道状态
    return rag
参见 test_neo4j.py 获取可运行的示例。
使用 PostgreSQL 存储
对于生产级场景,您很可能需要使用企业级解决方案。PostgreSQL 可以为您提供一站式解决方案,作为 KV 存储、VectorDB(pgvector)和 GraphDB(apache AGE)。支持 PostgreSQL 16.6 或更高版本。
- PostgreSQL 很轻量,包含所有必要插件的完整二进制发行版可以压缩到 40MB:参考 Windows Release,Linux/Mac 也很容易安装。
- 如果您喜欢 docker,建议初学者使用此镜像以避免出现问题(默认用户密码:rag/rag):https://hub.docker.com/r/gzdaniel/postgres-for-rag
- 如何开始?参考:examples/lightrag_gemini_postgres_demo.py
- 对于高性能图数据库需求,推荐使用 Neo4j,因为 Apache AGE 的性能不够理想。
使用 Faiss 存储
在使用 Faiss 向量数据库之前,您必须手动安装 faiss-cpu 或 faiss-gpu。
- 安装所需依赖:
pip install faiss-cpu
如果您有 GPU 支持,也可以安装 faiss-gpu。
- 这里我们使用
sentence-transformers,但您也可以使用3072维度的OpenAIEmbedding模型。
async def embedding_func(texts: list[str]) -> np.ndarray:
    model = SentenceTransformer('all-MiniLM-L6-v2')
    embeddings = model.encode(texts, convert_to_numpy=True)
    return embeddings

# 使用 LLM 模型函数和嵌入函数初始化 LightRAG
rag = LightRAG(
    working_dir=WORKING_DIR,
    llm_model_func=llm_model_func,
    embedding_func=EmbeddingFunc(
        embedding_dim=384,
        max_token_size=2048,
        model_name="all-MiniLM-L6-v2",
        func=embedding_func,
    ),
    vector_storage="FaissVectorDBStorage",
    vector_db_storage_cls_kwargs={
        "cosine_better_than_threshold": 0.3  # 您期望的阈值
    }
)
使用 Memgraph 存储
- Memgraph 是一个高性能的内存图数据库,兼容 Neo4j Bolt 协议。
- 您可以使用 Docker 在本地运行 Memgraph 进行简单测试:
- 参见:https://memgraph.com/download
export MEMGRAPH_URI="bolt://localhost:7687"

# 为 LightRAG 设置日志
setup_logger("lightrag", level="INFO")

# 启动项目时,通过指定 kg="MemgraphStorage" 来覆盖默认的 KG: NetworkX。

# 注意:默认设置使用 NetworkX
# 使用 Memgraph 实现初始化 LightRAG。
async def initialize_rag():
    rag = LightRAG(
        working_dir=WORKING_DIR,
        llm_model_func=gpt_4o_mini_complete,  # 使用 gpt_4o_mini_complete LLM 模型
        graph_storage="MemgraphStorage", #<-----------覆盖 KG 默认值
    )

    # 初始化数据库连接
    await rag.initialize_storages()
    # 初始化文档处理的管道状态
    return rag
使用 MongoDB 存储
MongoDB 为 LightRAG 提供了一站式存储解决方案。MongoDB 提供原生的 KV 存储和向量存储。LightRAG 使用 MongoDB 集合来实现简单的图存储。MongoDB 官方的向量搜索功能($vectorSearch)目前需要其官方云服务 MongoDB Atlas。此功能无法在自托管的 MongoDB Community/Enterprise 版本上使用。
使用 Redis 存储
LightRAG 支持使用 Redis 作为 KV 存储。使用 Redis 存储时,需要注意持久化配置和内存使用配置。以下是推荐的 Redis 配置:
save 900 1
save 300 10
save 60 1000
stop-writes-on-bgsave-error yes
maxmemory 4gb
maxmemory-policy noeviction
maxclients 500
LightRAG 实例之间的数据隔离
workspace 参数确保不同 LightRAG 实例之间的数据隔离。一旦初始化,workspace 是不可变的,无法更改。以下是不同类型存储实现工作区的方式:
- 对于基于本地文件的数据库,通过工作区子目录实现数据隔离:
JsonKVStorage、JsonDocStatusStorage、NetworkXStorage、NanoVectorDBStorage、FaissVectorDBStorage。 - 对于以集合方式存储数据的数据库,通过在集合名称前添加工作区前缀来实现:
RedisKVStorage、RedisDocStatusStorage、MilvusVectorDBStorage、MongoKVStorage、MongoDocStatusStorage、MongoVectorDBStorage、MongoGraphStorage、PGGraphStorage。 - 对于 Qdrant 向量数据库,通过基于 payload 的分区实现数据隔离(Qdrant 推荐的多租户方法):
QdrantVectorDBStorage使用带有 payload 过滤的共享集合,实现无限的工作区可扩展性。 - 对于关系型数据库,通过在表中添加
workspace字段实现逻辑数据分离:PGKVStorage、PGVectorStorage、PGDocStatusStorage。 - 对于 Neo4j 图数据库,通过标签实现逻辑数据隔离:
Neo4JStorage
为了保持与旧数据的兼容性,当未配置工作区时,PostgreSQL 非图存储的默认工作区为 default,PostgreSQL AGE 图存储的默认工作区为 null,Neo4j 图存储的默认工作区为 base。对于所有外部存储,系统提供专用的工作区环境变量来覆盖通用的 WORKSPACE 环境变量配置。这些存储特定的工作区环境变量包括:REDIS_WORKSPACE、MILVUS_WORKSPACE、QDRANT_WORKSPACE、MONGODB_WORKSPACE、POSTGRES_WORKSPACE、NEO4J_WORKSPACE。
AGENTS.md -- 指导编码代理
AGENTS.md 是一种简单、开放的格式,用于指导编码代理(https://agents.md/)。它是一个专门的、可预测的地方,用于提供上下文和指令,帮助 AI 编码代理在 LightRAG 项目上工作。不同的 AI 编码器不应单独维护各自的指导文件。如果任何 AI 编码器无法自动识别 AGENTS.md,可以使用符号链接作为解决方案。建立符号链接后,可以通过配置本地的 .gitignore_global 来防止它们被提交到 Git 仓库。
编辑实体和关系
LightRAG 现在支持全面的知识图谱管理功能,允许您在知识图谱中创建、编辑和删除实体和关系。
创建实体和关系
# 创建新实体
entity = rag.create_entity("Google", {
    "description": "Google 是一家专注于互联网相关服务和产品的跨国科技公司。",
    "entity_type": "company"
})

# 创建另一个实体
product = rag.create_entity("Gmail", {
    "description": "Gmail 是 Google 开发的电子邮件服务。",
    "entity_type": "product"
})

# 创建实体之间的关系
relation = rag.create_relation("Google", "Gmail", {
    "description": "Google 开发和运营 Gmail。",
    "keywords": "develops operates service",
    "weight": 2.0
})
手动修改实体与关系
# Edit an existing entity
updated_entity = rag.edit_entity("Google", {
    "description": "Google is a subsidiary of Alphabet Inc., founded in 1998.",
    "entity_type": "tech_company"
})

# Rename an entity (with all its relationships properly migrated)
renamed_entity = rag.edit_entity("Gmail", {
    "entity_name": "Google Mail",
    "description": "Google Mail (formerly Gmail) is an email service."
})

# Edit a relation between entities
updated_relation = rag.edit_relation("Google", "Google Mail", {
    "description": "Google created and maintains Google Mail service.",
    "keywords": "creates maintains email service",
    "weight": 3.0
})
所有操作均提供同步和异步两个版本。异步版本带有 "a" 前缀(例如:acreate_entity、aedit_relation)。
插入自定义知识图谱
custom_kg = {
        "chunks": [
            {
                "content": "Alice and Bob are collaborating on quantum computing research.",
                "source_id": "doc-1",
                "file_path": "test_file",
            }
        ],
        "entities": [
            {
                "entity_name": "Alice",
                "entity_type": "person",
                "description": "Alice is a researcher specializing in quantum physics.",
                "source_id": "doc-1",
                "file_path": "test_file"
            },
            {
                "entity_name": "Bob",
                "entity_type": "person",
                "description": "Bob is a mathematician.",
                "source_id": "doc-1",
                "file_path": "test_file"
            },
            {
                "entity_name": "Quantum Computing",
                "entity_type": "technology",
                "description": "Quantum computing utilizes quantum mechanical phenomena for computation.",
                "source_id": "doc-1",
                "file_path": "test_file"
            }
        ],
        "relationships": [
            {
                "src_id": "Alice",
                "tgt_id": "Bob",
                "description": "Alice and Bob are research partners.",
                "keywords": "collaboration research",
                "weight": 1.0,
                "source_id": "doc-1",
                "file_path": "test_file"
            },
            {
                "src_id": "Alice",
                "tgt_id": "Quantum Computing",
                "description": "Alice conducts research on quantum computing.",
                "keywords": "research expertise",
                "weight": 1.0,
                "source_id": "doc-1",
                "file_path": "test_file"
            },
            {
                "src_id": "Bob",
                "tgt_id": "Quantum Computing",
                "description": "Bob researches quantum computing.",
                "keywords": "research application",
                "weight": 1.0,
                "source_id": "doc-1",
                "file_path": "test_file"
            }
        ]
    }

rag.insert_custom_kg(custom_kg)
其它实体与关系操作
- create_entity:创建具有指定属性的新实体
- edit_entity:更新现有实体的属性或重命名它
- create_relation:在现有实体之间创建新关系
- edit_relation:更新现有关系的属性
这些操作在图数据库和向量数据库组件之间保持数据一致性,确保您的知识图谱保持连贯。
删除功能
LightRAG 提供了全面的删除能力,允许您删除文档、实体和关系。
删除实体
您可以通过实体名称删除实体及其所有关联关系:
# 删除实体及其所有关系(同步版本)
rag.delete_by_entity("Google")

# 异步版本
await rag.adelete_by_entity("Google")
删除实体时:
- 从知识图谱中移除该实体节点
- 删除所有关联的关系
- 从向量数据库中移除相关的嵌入向量
- 保持知识图谱的完整性
删除关系
您可以删除两个特定实体之间的关系:
# 删除两个实体之间的关系(同步版本)
rag.delete_by_relation("Google", "Gmail")

# 异步版本
await rag.adelete_by_relation("Google", "Gmail")
删除关系时:
- 移除指定的关系边
- 从向量数据库中删除该关系的嵌入向量
- 保留实体节点及其它关系
通过文档 ID 删除
您可以通过文档 ID 删除整个文档及其所有相关的知识:
# 通过文档 ID 删除(异步版本)
await rag.adelete_by_doc_id("doc-12345")
通过文档 ID 删除时的优化处理:
- 智能清理:自动识别并删除仅属于该文档的实体和关系
- 保留共享知识:如果实体或关系在其他文档中也存在,则会保留并重新构建其描述
- 缓存优化:清理相关的 LLM 缓存以减少存储开销
- 增量重建:从剩余文档中重新构建受影响的实体和关系描述
删除过程包括:
- 删除与该文档相关的所有文本块
- 识别并删除仅属于该文档的实体和关系
- 重新构建在其他文档中仍存在的实体和关系
- 更新所有相关的向量索引
- 清理文档状态记录
注意:由于涉及复杂的知识图谱重构过程,通过文档 ID 删除是一个异步操作。
重要提醒:
- 不可逆操作:所有删除操作都是不可逆的,请谨慎使用
- 性能考虑:删除大量数据可能需要一些时间,特别是通过文档 ID 删除
- 数据一致性:删除操作会自动维护知识图谱与向量数据库之间的一致性
- 备份建议:在执行重要删除操作前,请考虑备份数据
批量删除建议:
- 对于批量删除操作,建议使用异步方法以获得更好的性能
- 对于大规模删除,建议分批处理以避免系统负载过高
实体合并
合并实体及其关系
LightRAG 现在支持将多个实体合并为单个实体,并自动处理所有关系:
# 基础实体合并
rag.merge_entities(
    source_entities=["Artificial Intelligence", "AI", "Machine Intelligence"],
    target_entity="AI Technology"
)
使用自定义合并策略:
# 为不同字段定义自定义合并策略
rag.merge_entities(
    source_entities=["John Smith", "Dr. Smith", "J. Smith"],
    target_entity="John Smith",
    merge_strategy={
        "description": "concatenate",  # 合并所有描述
        "entity_type": "keep_first",   # 保留第一个实体的类型
        "source_id": "join_unique"     # 合并所有唯一的源 ID
    }
)
使用自定义目标实体数据:
# 为合并后的实体指定精确值
rag.merge_entities(
    source_entities=["New York", "NYC", "Big Apple"],
    target_entity="New York City",
    target_entity_data={
        "entity_type": "LOCATION",
        "description": "New York City is the most populous city in the United States.",
    }
)
结合上述两种方式的高级用法:
# 合并公司实体,同时使用策略和自定义数据
rag.merge_entities(
    source_entities=["Microsoft Corp", "Microsoft Corporation", "MSFT"],
    target_entity="Microsoft",
    merge_strategy={
        "description": "concatenate",  # 合并所有描述
        "source_id": "join_unique"     # 合并源 ID
    },
    target_entity_data={
        "entity_type": "ORGANIZATION",
    }
)
合并实体时:
- 所有来自源实体的关系都会重定向到目标实体
- 重复的关系会被智能合并
- 防止出现自我指向的关系(自环)
- 合并完成后源实体会被移除
- 关系权重和属性会被保留
多模态文档处理(RAG-Anything 集成)
LightRAG 现已与 RAG-Anything 无缝集成,这是一个专门为 LightRAG 构建的全能多模态文档处理 RAG 系统。RAG-Anything 能够实现先进的解析和检索增强生成(RAG)能力,允许您无缝处理多模态文档,并从各种文档格式中提取结构化内容——包括文本、图像、表格和公式——以集成到您的 RAG 流程中。
核心特性:
- 端到端多模态流程:从文档摄取解析到智能多模态问答的完整工作流程
- 通用文档支持:无缝处理 PDF、Office 文档(DOC/DOCX/PPT/PPTX/XLS/XLSX)、图像及多种文件格式
- 专业内容分析:针对图像、表格、数学公式及异构内容类型的专用处理器
- 多模态知识图谱:自动实体提取和跨模态关系发现,增强理解力
- 混合智能检索:跨越文本和多模态内容的高级搜索能力,具备上下文理解
快速开始:
-
安装 RAG-Anything:
pip install raganything -
处理多模态文档:
RAGAnything 使用示例
    import asyncio
    from raganything import RAGAnything
    from lightrag import LightRAG
    from lightrag.llm.openai import openai_complete_if_cache, openai_embed
    from lightrag.utils import EmbeddingFunc
    import os

    async def load_existing_lightrag():
        # 首先,创建或加载一个现有的 LightRAG 实例
        lightrag_working_dir = "./existing_lightrag_storage"

        # 检查先前的 LightRAG 实例是否存在
        if os.path.exists(lightrag_working_dir) and os.listdir(lightrag_working_dir):
            print("✅ Found existing LightRAG instance, loading...")
        else:
            print("❌ No existing LightRAG instance found, will create new one")

        from functools import partial

        # 使用您的配置创建/加载 LightRAG 实例
        lightrag_instance = LightRAG(
            working_dir=lightrag_working_dir,
            llm_model_func=lambda prompt, system_prompt=None, history_messages=[], **kwargs: openai_complete_if_cache(
                "gpt-4o-mini",
                prompt,
                system_prompt=system_prompt,
                history_messages=history_messages,
                api_key="your-api-key",
                **kwargs,
            ),
            embedding_func=EmbeddingFunc(
                embedding_dim=3072,
                max_token_size=8192,
                model="text-embedding-3-large",
                func=partial(
                    openai_embed.func,  # 使用 .func 访问未封装的原始函数
                    model="text-embedding-3-large",
                    api_key=api_key,
                    base_url=base_url,
                ),
            )
        )

        # 初始化存储(这将加载现有数据,如果有的话)
        await lightrag_instance.initialize_storages()

        # 现在使用现有的 LightRAG 实例初始化 RAGAnything
        rag = RAGAnything(
            lightrag=lightrag_instance,  # 传入现有的 LightRAG 实例
            # 仅在多模态处理时需要视觉模型
            vision_model_func=lambda prompt, system_prompt=None, history_messages=[], image_data=None, **kwargs: openai_complete_if_cache(
                "gpt-4o",
                "",
                system_prompt=None,
                history_messages=[],
                messages=[
                    {"role": "system", "content": system_prompt} if system_prompt else None,
                    {"role": "user", "content": [
                        {"type": "text", "text": prompt},
                        {"type": "image_url", "image_url": {"url": f"data:image/jpeg;base64,{image_data}"}}
                    ]} if image_data else {"role": "user", "content": prompt}
                ],
                api_key="your-api-key",
                **kwargs,
            ) if image_data else openai_complete_if_cache(
                "gpt-4o-mini",
                prompt,
                system_prompt=system_prompt,
                history_messages=history_messages,
                api_key="your-api-key",
                **kwargs,
            )
            # 注意:working_dir, llm_model_func, embedding_func 等都继承自 lightrag_instance
        )

        # 查询现有的知识库
        result = await rag.query_with_multimodal(
            "What data has been processed in this LightRAG instance?",
            mode="hybrid"
        )
        print("Query result:", result)

        # 向现有的 LightRAG 实例添加新的多模态文档
        await rag.process_document_complete(
            file_path="path/to/new/multimodal_document.pdf",
            output_dir="./output"
        )

    if __name__ == "__main__":
        asyncio.run(load_existing_lightrag())
有关详细文档和高级用法,请参考 RAG-Anything 仓库。
Token 使用量跟踪
概览与用法
LightRAG 提供了一个 TokenTracker 工具,用于监控和管理大语言模型的 token 消耗情况。此功能对于控制 API 成本和优化性能非常有用。
用法
from lightrag.utils import TokenTracker

# 创建 TokenTracker 实例
token_tracker = TokenTracker()

# 方法 1:使用上下文管理器(推荐)
# 适用于需要自动跟踪 token 使用量的场景
with token_tracker:
    result1 = await llm_model_func("your question 1")
    result2 = await llm_model_func("your question 2")

# 方法 2:手动添加 token 使用记录
# 适用于需要更精细控制 token 统计的场景
token_tracker.reset()

rag.insert()

rag.query("your question 1", param=QueryParam(mode="naive"))
rag.query("your question 2", param=QueryParam(mode="mix"))

# 显示总 token 使用量(包括插入和查询操作)
print("Token usage:", token_tracker.get_usage())
使用技巧
- 在长会话或批量操作中使用上下文管理器,自动跟踪所有 token 消耗
- 对于需要分段统计的场景,使用手动模式并在适当时候调用 reset()
- 定期检查 token 使用量有助于及早发现异常消耗
- 在开发和测试过程中积极使用此功能,以优化生产成本
实践案例
您可以参考以下示例来实施 token 跟踪:
examples/lightrag_gemini_track_token_demo.py:使用 Google Gemini 模型的 token 跟踪示例examples/lightrag_siliconcloud_track_token_demo.py:使用 SiliconCloud 模型的 token 跟踪示例
这些示例展示了如何在不同模型和场景下有效地使用 TokenTracker 功能。
数据导出功能
概览
LightRAG 允许您以各种格式导出知识图谱数据,用于分析、共享和备份。系统支持导出实体、关系及关系数据。
导出函数
基础用法
# 基础 CSV 导出(默认格式)
rag.export_data("knowledge_graph.csv")

# 指定任意格式
rag.export_data("output.xlsx", file_format="excel")
支持的不同文件格式
# 以 CSV 格式导出数据
rag.export_data("graph_data.csv", file_format="csv")

# 导出到 Excel 工作表
rag.export_data("graph_data.xlsx", file_format="excel")

# 以 markdown 格式导出数据
rag.export_data("graph_data.md", file_format="md")

# 导出为纯文本
rag.export_data("graph_data.txt", file_format="txt")
附加选项
在导出中包含向量嵌入(可选):
rag.export_data("complete_data.csv", include_vector_data=True)
导出中包含的数据
所有导出均包含:
- 实体信息(名称、ID、元数据)
- 关系数据(实体间的连接)
- 来自向量数据库的关系信息
缓存
清除缓存
您可以使用不同的模式清除 LLM 响应缓存:
# 清除所有缓存
await rag.aclear_cache()

# 清除 local 模式缓存
await rag.aclear_cache(modes=["local"])

# 清除提取(extraction)缓存
await rag.aclear_cache(modes=["default"])

# 清除多个模式的缓存
await rag.aclear_cache(modes=["local", "global", "hybrid"])

# 同步版本
rag.clear_cache(modes=["local"])
有效模式包括:
"default":提取缓存"naive":朴素搜索缓存"local":本地搜索缓存"global":全局搜索缓存"hybrid":混合搜索缓存"mix":混合(Mix)搜索缓存
故障排除
常见初始化错误
如果您在使用 LightRAG 时遇到以下错误:
-
AttributeError: __aenter__- 原因:存储后端未初始化
- 解决方案:在创建 LightRAG 实例后调用
await rag.initialize_storages()
-
KeyError: 'history_messages'- 原因:流水线状态未初始化
- 解决方案:在创建 LightRAG 实例后调用
await rag.initialize_storages()
-
两个错误相继出现
- 原因:两个初始化方法都未被调用
- 解决方案:始终遵循以下模式:
rag = LightRAG(...)
await rag.initialize_storages()
模型切换问题
在不同的嵌入模型(embedding models)之间切换时,您必须清空数据目录以避免错误。如果您希望保留 LLM 缓存,唯一可以保留的文件是 kv_store_llm_response_cache.json。
LightRAG API
LightRAG 服务器旨在提供 Web UI 和 API 支持。有关 LightRAG 服务器的更多信息,请参考 LightRAG Server。
图谱可视化
LightRAG 服务器提供了全面的知识图谱可视化功能。它支持各种重力布局、节点查询、子图过滤等。有关 LightRAG 服务器的更多信息,请参考 LightRAG Server。

Langfuse 可观测性集成
Langfuse 提供了一个可以直接替换 OpenAI 客户端的方案,自动跟踪所有 LLM 交互,使开发者能够在不更改代码的情况下监控、调试和优化其 RAG 系统。
安装可观测性选项
pip install lightrag-hku
pip install lightrag-hku[observability]

# 或从源代码安装并启用调试模式
pip install -e .
pip install -e ".[observability]"
配置 Langfuse 环境变量
修改 .env 文件:
## Langfuse Observability (Optional)
# LLM observability and tracing platform
# Install with: pip install lightrag-hku[observability]
# Sign up at: https://cloud.langfuse.com or self-host
LANGFUSE_SECRET_KEY=""
LANGFUSE_PUBLIC_KEY=""
LANGFUSE_HOST="https://cloud.langfuse.com"  # 或您的自托管实例
LANGFUSE_ENABLE_TRACE=true
Langfuse 用法
安装并配置完成后,Langfuse 会自动追踪所有 OpenAI LLM 调用。Langfuse 仪表板功能包括:
- 追踪(Tracing):查看完整的 LLM 调用链
- 分析(Analytics):Token 使用情况、延迟、成本指标
- 调试(Debugging):检查提示词和响应
- 评估(Evaluation):比较模型输出
- 监控(Monitoring):实时告警
重要通知
注意:LightRAG 目前仅将 OpenAI 兼容的 API 调用与 Langfuse 集成。Ollama、Azure 和 AWS Bedrock 等 API 尚不支持 Langfuse 可观测性。
基于 RAGAS 的评估
RAGAS (Retrieval Augmented Generation Assessment) 是一个使用 LLM 对 RAG 系统进行无参考评估的框架。项目中包含一个基于 RAGAS 的评估脚本。有关详细信息,请参考 基于 RAGAS 的评估框架。
评估
数据集
LightRAG 中使用的数据集可以从 TommyChien/UltraDomain 下载。
生成查询
LightRAG 使用以下提示(prompt)生成高层级查询,相应代码位于 examples/generate_query.py。
提示词
Given the following description of a dataset:

{description}

Please identify 5 potential users who would engage with this dataset. For each user, list 5 tasks they would perform with this dataset. Then, for each (user, task) combination, generate 5 questions that require a high-level understanding of the entire dataset.

Output the results in the following structure:
- User 1: [user description]
    - Task 1: [task description]
        - Question 1:
        - Question 2:
        - Question 3:
        - Question 4:
        - Question 5:
    - Task 2: [task description]
        ...
    - Task 5: [task description]
- User 2: [user description]
    ...
- User 5: [user description]
    ...
批量评估
为了在处理高层级查询时评估两个 RAG 系统的性能,LightRAG 使用以下提示词,具体代码见 reproduce/batch_eval.py。
提示词
---Role---
You are an expert tasked with evaluating two answers to the same question based on three criteria: **Comprehensiveness**, **Diversity**, and **Empowerment**.
---Goal---
You will evaluate two answers to the same question based on three criteria: **Comprehensiveness**, **Diversity**, and **Empowerment**.

- **Comprehensiveness**: How much detail does the answer provide to cover all aspects and details of the question?
- **Diversity**: How varied and rich is the answer in providing different perspectives and insights on the question?
- **Empowerment**: How well does the answer help the reader understand and make informed judgments about the topic?

For each criterion, choose the better answer (either Answer 1 or Answer 2) and explain why. Then, select an overall winner based on these three categories.

Here is the question:
{query}

Here are the two answers:

**Answer 1:**
{answer1}

**Answer 2:**
{answer2}

Evaluate both answers using the three criteria listed above and provide detailed explanations for each criterion.

Output your evaluation in the following JSON format:

{{
    "Comprehensiveness": {{
        "Winner": "[Answer 1 or Answer 2]",
        "Explanation": "[Provide explanation here]"
    }},
    "Empowerment": {{
        "Winner": "[Answer 1 or Answer 2]",
        "Explanation": "[Provide explanation here]"
    }},
    "Overall Winner": {{
        "Winner": "[Answer 1 or Answer 2]",
        "Explanation": "[Summarize why this answer is the overall winner based on the three criteria]"
    }}
}}
总体性能表
| 农业 | 计算机科学 | 法律 | 混合 | |||||
|---|---|---|---|---|---|---|---|---|
| NaiveRAG | LightRAG | NaiveRAG | LightRAG | NaiveRAG | LightRAG | NaiveRAG | LightRAG | |
| 全面性 | 32.4% | 67.6% | 38.4% | 61.6% | 16.4% | 83.6% | 38.8% | 61.2% |
| 多样性 | 23.6% | 76.4% | 38.0% | 62.0% | 13.6% | 86.4% | 32.4% | 67.6% |
| 赋能性 | 32.4% | 67.6% | 38.8% | 61.2% | 16.4% | 83.6% | 42.8% | 57.2% |
| 总体 | 32.4% | 67.6% | 38.8% | 61.2% | 15.2% | 84.8% | 40.0% | 60.0% |
| RQ-RAG | LightRAG | RQ-RAG | LightRAG | RQ-RAG | LightRAG | RQ-RAG | LightRAG | |
| 全面性 | 31.6% | 68.4% | 38.8% | 61.2% | 15.2% | 84.8% | 39.2% | 60.8% |
| 多样性 | 29.2% | 70.8% | 39.2% | 60.8% | 11.6% | 88.4% | 30.8% | 69.2% |
| 赋能性 | 31.6% | 68.4% | 36.4% | 63.6% | 15.2% | 84.8% | 42.4% | 57.6% |
| 总体 | 32.4% | 67.6% | 38.0% | 62.0% | 14.4% | 85.6% | 40.0% | 60.0% |
| HyDE | LightRAG | HyDE | LightRAG | HyDE | LightRAG | HyDE | LightRAG | |
| 全面性 | 26.0% | 74.0% | 41.6% | 58.4% | 26.8% | 73.2% | 40.4% | 59.6% |
| 多样性 | 24.0% | 76.0% | 38.8% | 61.2% | 20.0% | 80.0% | 32.4% | 67.6% |
| 赋能性 | 25.2% | 74.8% | 40.8% | 59.2% | 26.0% | 74.0% | 46.0% | 54.0% |
| 总体 | 24.8% | 75.2% | 41.6% | 58.4% | 26.4% | 73.6% | 42.4% | 57.6% |
| GraphRAG | LightRAG | GraphRAG | LightRAG | GraphRAG | LightRAG | GraphRAG | LightRAG | |
| 全面性 | 45.6% | 54.4% | 48.4% | 51.6% | 48.4% | 51.6% | 50.4% | 49.6% |
| 多样性 | 22.8% | 77.2% | 40.8% | 59.2% | 26.4% | 73.6% | 36.0% | 64.0% |
| 赋能性 | 41.2% | 58.8% | 45.2% | 54.8% | 43.6% | 56.4% | 50.8% | 49.2% |
| 总体 | 45.2% | 54.8% | 48.0% | 52.0% | 47.2% | 52.8% | 50.4% | 49.6% |
复现
所有代码均可在 ./reproduce 目录中找到。
Step-0 提取唯一上下文
首先,我们需要提取数据集中的唯一上下文(unique contexts)。
代码
def extract_unique_contexts(input_directory, output_directory):

    os.makedirs(output_directory, exist_ok=True)

    jsonl_files = glob.glob(os.path.join(input_directory, '*.jsonl'))
    print(f"Found {len(jsonl_files)} JSONL files.")

    for file_path in jsonl_files:
        filename = os.path.basename(file_path)
        name, ext = os.path.splitext(filename)
        output_filename = f"{name}_unique_contexts.json"
        output_path = os.path.join(output_directory, output_filename)

        unique_contexts_dict = {}

        print(f"Processing file: {filename}")

        try:
            with open(file_path, 'r', encoding='utf-8') as infile:
                for line_number, line in enumerate(infile, start=1):
                    line = line.strip()
                    if not line:
                        continue
                    try:
                        json_obj = json.loads(line)
                        context = json_obj.get('context')
                        if context and context not in unique_contexts_dict:
                            unique_contexts_dict[context] = None
                    except json.JSONDecodeError as e:
                        print(f"JSON decoding error in file {filename} at line {line_number}: {e}")
        except FileNotFoundError:
            print(f"File not found: {filename}")
            continue
        except Exception as e:
            print(f"An error occurred while processing file {filename}: {e}")
            continue

        unique_contexts_list = list(unique_contexts_dict.keys())
        print(f"There are {len(unique_contexts_list)} unique `context` entries in the file {filename}.")

        try:
            with open(output_path, 'w', encoding='utf-8') as outfile:
                json.dump(unique_contexts_list, outfile, ensure_ascii=False, indent=4)
            print(f"Unique `context` entries have been saved to: {output_filename}")
        except Exception as e:
            print(f"An error occurred while saving to the file {output_filename}: {e}")

    print("All files have been processed.")
Step-1 插入上下文
我们将提取出的上下文插入到 LightRAG 系统中。
代码
def insert_text(rag, file_path):
    with open(file_path, mode='r') as f:
        unique_contexts = json.load(f)

    retries = 0
    max_retries = 3
    while retries < max_retries:
        try:
            rag.insert(unique_contexts)
            break
        except Exception as e:
            retries += 1
            print(f"Insertion failed, retrying ({retries}/{max_retries}), error: {e}")
            time.sleep(10)
    if retries == max_retries:
        print("Insertion failed after exceeding the maximum number of retries")
Step-2 生成查询
我们从数据集每个上下文的前半部分和后半部分提取 token,然后将它们组合作为数据集描述来生成查询。
代码
tokenizer = GPT2Tokenizer.from_pretrained('gpt2')

def get_summary(context, tot_tokens=2000):
    tokens = tokenizer.tokenize(context)
    half_tokens = tot_tokens // 2

    start_tokens = tokens[1000:1000 + half_tokens]
    end_tokens = tokens[-(1000 + half_tokens):1000]

    summary_tokens = start_tokens + end_tokens
    summary = tokenizer.convert_tokens_to_string(summary_tokens)

    return summary
Step-3 查询
对于 Step-2 中生成的查询,我们将提取它们并对 LightRAG 进行查询。
代码
def extract_queries(file_path):
    with open(file_path, 'r') as f:
        data = f.read()

    data = data.replace('**', '')

    queries = re.findall(r'- Question \d+: (.+)', data)

    return queries
🔗 相关项目
生态与扩展
⭐ Star 历史
🤝 贡献
📖 引用
@article{guo2024lightrag,
title={LightRAG: Simple and Fast Retrieval-Augmented Generation},
author={Zirui Guo and Lianghao Xia and Yanhua Yu and Tu Ao and Chao Huang},
year={2024},
eprint={2410.05779},
archivePrefix={arXiv},
primaryClass={cs.IR}
}